Syncing calendar events with AppSheet
Building an app without writing code, can be a refreshing exercise to think differently about the development process. In another article, I described the steps required for developing a room booking app using the no-code platform AppSheet. But booking a room is not complete before the organizer received a confirmation. Therefore, this article explores options of adding events to a user's calendar.
Here is a quick summary of the RoomBooker: It stores sites, buildings and rooms in a Google Spreadsheet and allows users to book available rooms using a basic form. After a booking is added successfully, users expect it to appear in their calendar. Fortunately, AppSheet integrates with Google Calendar to manipulate calendar events. But there is an issue: calendars need to be added at build time, so we cannot interact with a user's calendar, since it is only known at runtime. To circumvent this, we need to create a new calendar specifically for this app. I decided to make this calendar available to public (or restrict it to a domain in a business environment), so anyone is able to see, when a room is booked. The app will sync bookings as meetings to the new calendar and invite the user as an attendee. The added benefit of this approach is, that users are not required to use a Google Calendar, but are free to use any provider as long as it accepts invitations via mail.
The calendar data can be added like any other data source using the "New Table" button on AppSheet's Data section. For the actual event creation, we use actions and workflows from the Behavior menu. First we create an action by performing the following steps:
- navigate to Behavior > Actions
- create a new action and call it "create event for room booking"
- set the affected table to
Room Booking - set the action to "Data: add a new row to another table using values from this row"
- select the table containing calendar events as the
table to add to - configure the values as shown in the image below
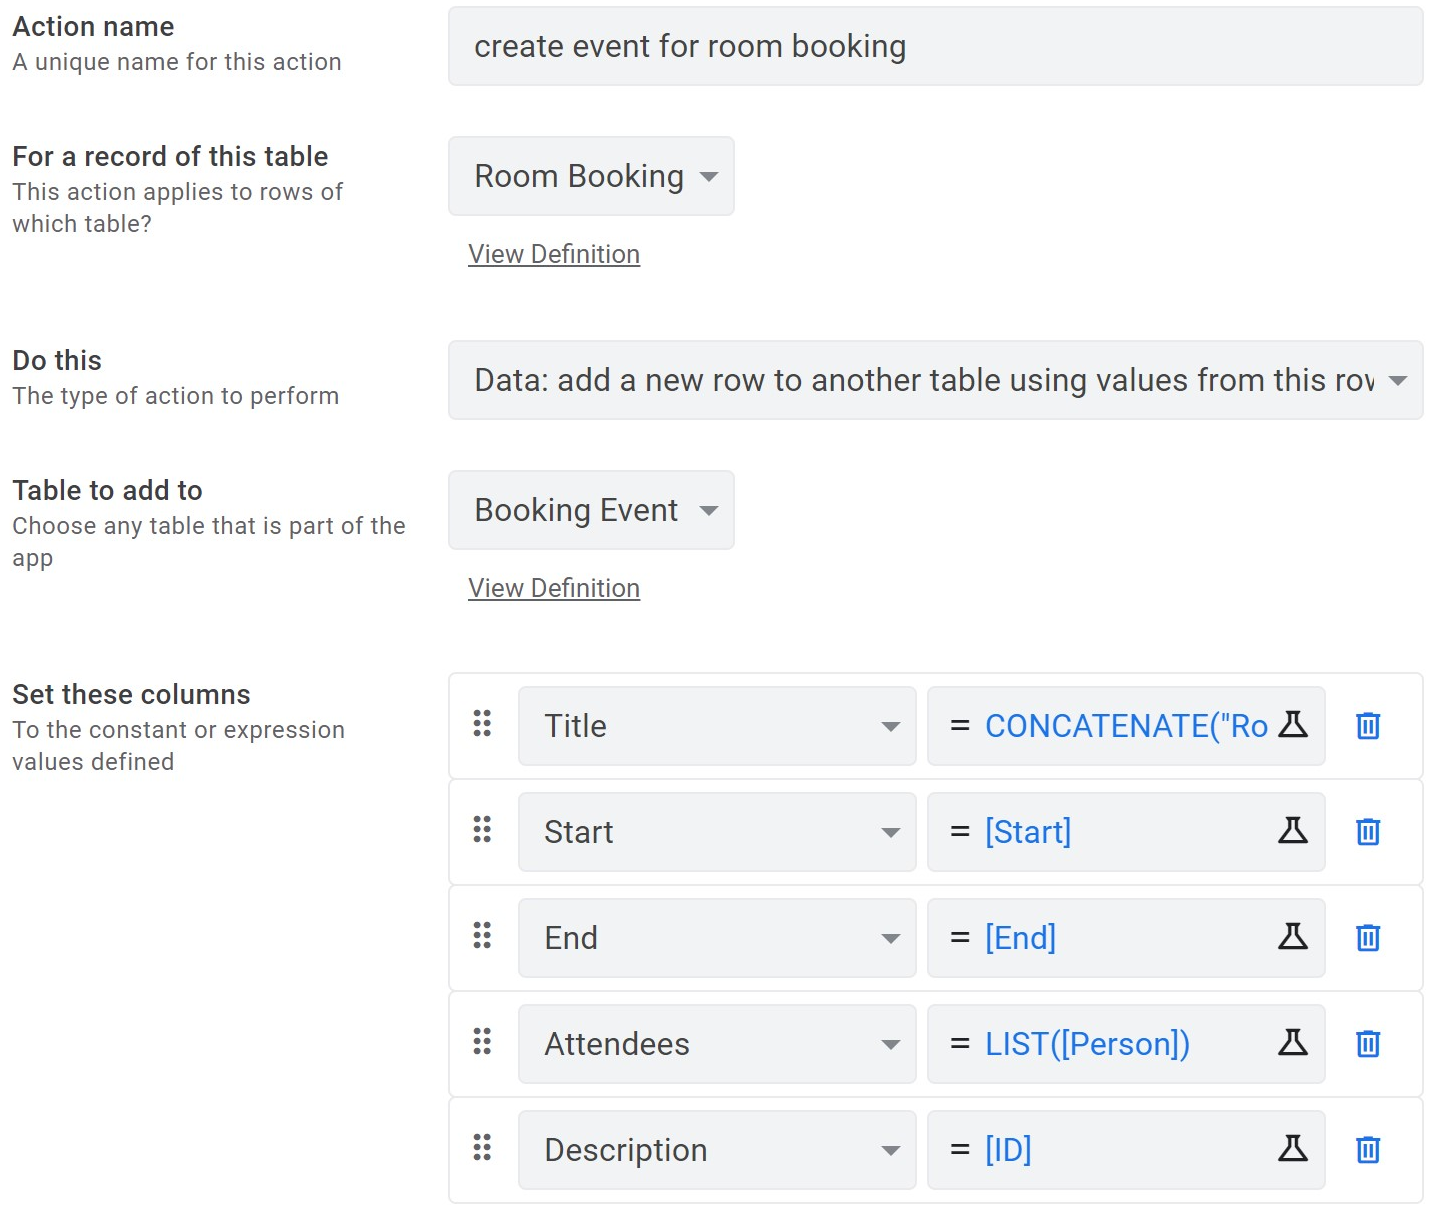
The title property is set to the formula CONCATENATE("Room Booking - ", [Room].[Name]) to include booking details, but any other value can be used. Above steps leave us with an action that can be manually triggered by users. For the action to be triggered automatically whenever a new room booking is created, AppSheet's workflows are the perfect fit. But first, let's go back to the action's Appearance options and hide it, so it can't be triggered manually. Then we create a new workflow:
- navigate to Behavior > Workflow
- create a new workflow and call it "on adding new room booking"
- set the target data to
Room Bookingand the event toADDS_ONLY - under
run these tasks...choosechange data - select our previously created action "create event for room booking"
With this setup, our goal is already achieved: whenever a user books a room, he or she will receive a calendar invitation for the selected times. Actually, we will dive deeper and update calendar events, when a booking is changed or deleted. The booking ID, which is saved within an events description comes in handy here. Let's first delete a booking's event:
- navigate to Behavior > Actions
- create a new action and call it "delete event for room booking"
- set the affected table to
Room Booking - set the action to "Data: execute an action on a set of rows"
- select the table containing calendar events as the
referenced table - insert the formula below into
Referenced Rowsand set the action to "Delete"
FILTER(
  "Booking Event",
  [Description] = [_THISROW].[ID]
)
To apply changes to a booking, we could propagate them to the calendar event by copying them in an action. Alternatively, we leverage the existing actions within a workflow to first delete the existing event and then create a new one with updated information.
Bonus Tip: if you want to create all day events from AppSheet, the end date needs to be one day apart from its start. This can be achieved by simply using the formula [Start] + 1 for an end date.