Displaying personalized content in AppSheet
I'm currently trying to build apps without writing code to find the limits and potential of no-code platforms. This article adds personalization to a room booking app built with AppSheet. The app allows users to manage rooms within their buildings and booking those rooms for meetings. If you are new to AppSheet, I recommend reading this article first.
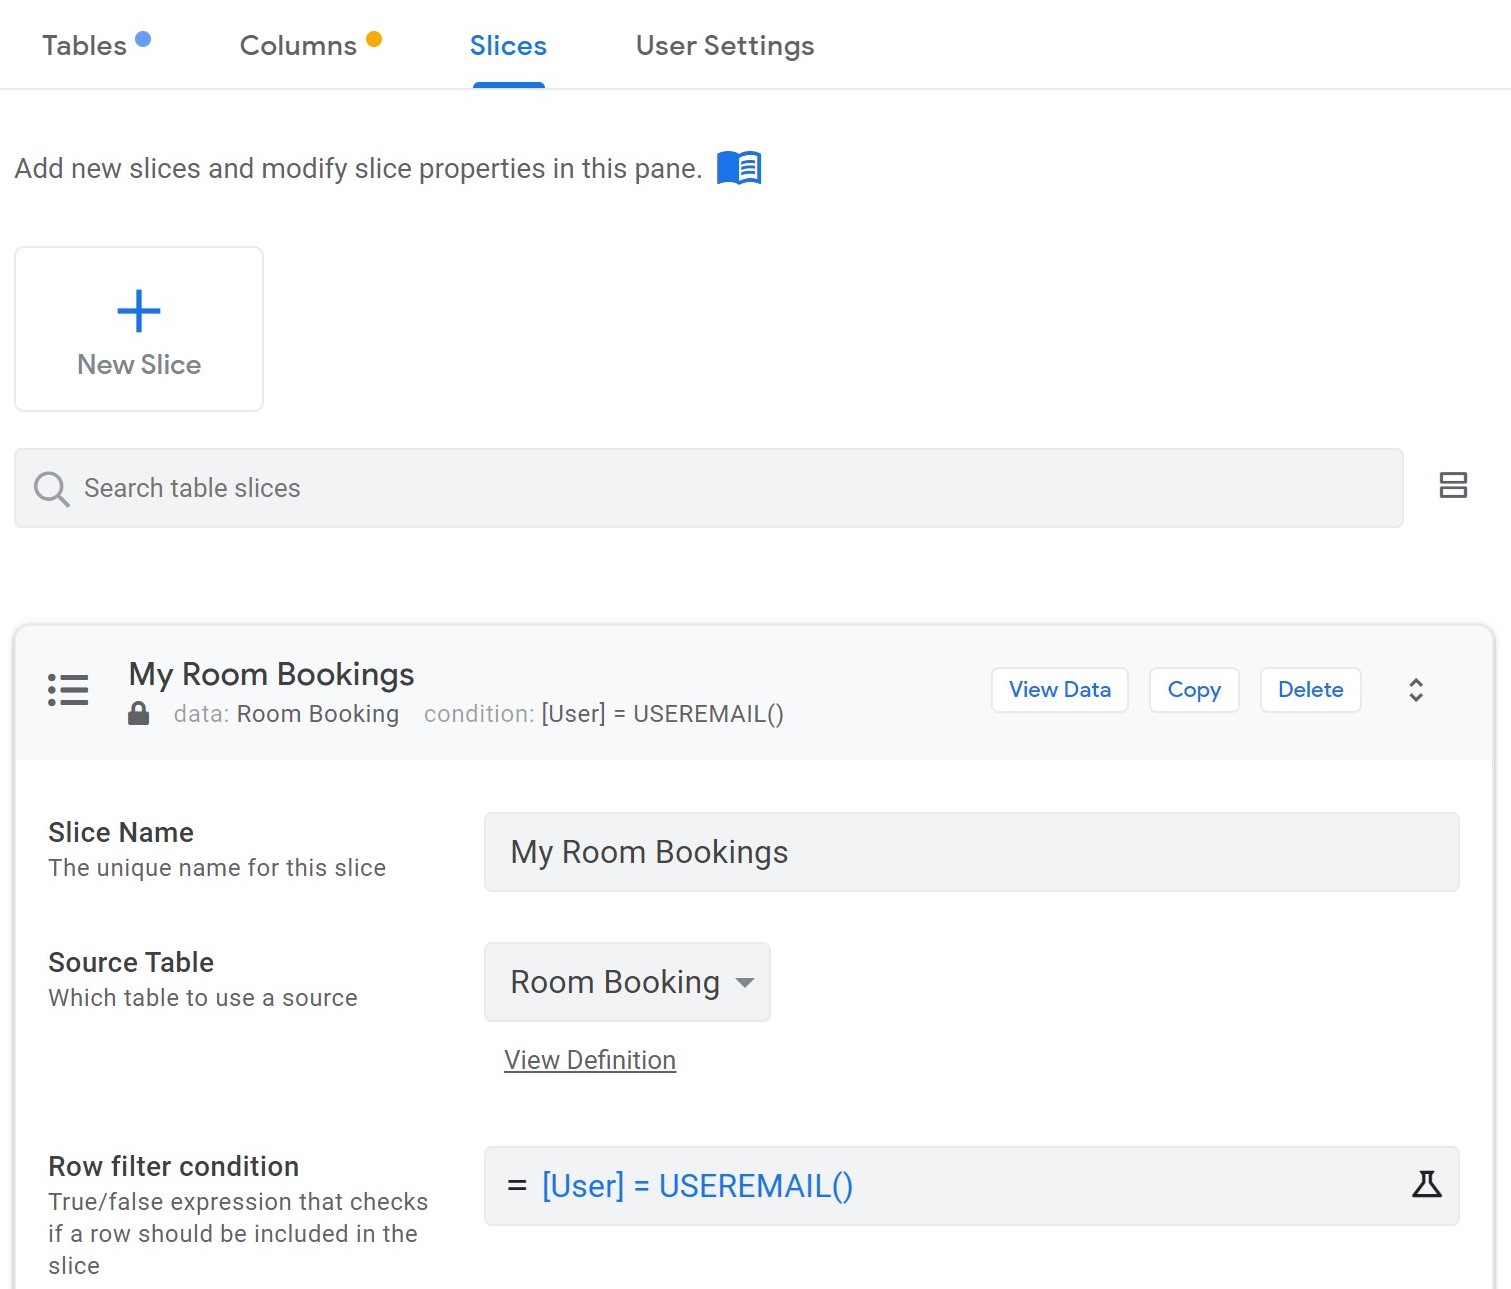
Our goal is to show users a list of their bookings as well as their favorite rooms. These views enhance user experience tremendously by providing quick access to relevant information. Let's get started with the personal booking overview: it makes use of AppSheet's slices under Data > Slices in the menu. A slice is a filtered subset of data, which can be used like a table. Since a booking already contains a column for the corresponding user, the filter condition is simply [User] = USEREMAIL(), as shown in the screenshot below.
Now, this slice can be used as the source of a new view in the UX menu. We call it "My Bookings" and select our slice for this data. I personally prefer the card view for this page, because it lets us show the room's picture, name and booking date, which makes for a clean and simple overview. And actually, that's all what is needed for adding the personal booking list.
Building the favorite rooms view turns out to be trickier. When browsing through AppSheet's features, you might stumble upon its User Settings in the Data menu. While this sounds like a suitable solution for storing preferences and favorites, it suffers from a hidden limitation: values stored in user settings are not synced across devices. This would lead to favorites being different, depending on the device a user opens your app on. Though useful in some situations, I'd rather keep the experience consistent across mobile and the web by writing the information into a Google Sheet.
When initially working on this feature, I found an approach in the forums, which adds and removes users' email addresses to a text column. Although this is a simple solution, which works in small apps, larger apps will run into issues: two users simultaneously adding a room to their favorites, results in a race condition for updating the cell value and data from one of the users might not be stored. Furthermore, searching for mail addresses in a long string of a much liked room is rather time consuming and decreases performance for loading favorites.
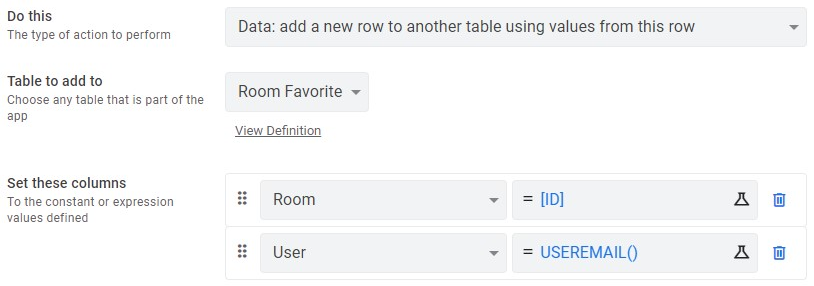
Therefore, I decided to introduce a mapping table for rooms and users; also known as many-to-many relationship in relational databases. This basically is a table with two columns: User and Room, both of which store the id/mail of a corresponding record. Whenever a user adds a room to their favorites, a new row with the corresponding mapping is added to the table and deleted, if the user removes it from the favorites. This approach has a surprising advantage besides its scalability and failure prevention: changes are shown to the user in real time, whereas the text column approach requires a manual sync to show changes in the UI. Though I couldn't find documentation for this behavior, it is good to know that row-level operations allow for instantaneous UI updates. We can see this when implementing our "favorite" buttons: navigate to Behavior → Actions and create a new action called "add room favorite". Select the Room table and tell it to "add a new row to another table using values from this row" and choose the Room Favorite table to add to. The column setup is shown in the following screenshot.
In the Behavior section of this action, I add a little snippet to the visibility condition:
ISBLANK(
  FILTER(
    "Room Favorite",
    AND(
      USEREMAIL() = [User],
      [_THISROW].[Id] = [Room]
    )
  )
)
This ensures that the button is only shown, when the room is not already a favorite of this user. Now we can add a corresponding "unfavorite" button, which is only shown, when the opposite condition is true:
ISNOTBLANK(
  FILTER(
    "Room Favorite",
    AND(
      USEREMAIL() = [User],
      [_THISROW].[Id] = [Room]
    )
  )
)
The logic here is to filter for all rooms, which have an entry in the Room Favorite table, while this entry also matches the currently signed in user. The table setup for this action is identical to above's action, but it instead "executes an action on a set of rows", which we set to the the system-level "Delete" action. The referenced rows to delete are given by this formula: FILTER("Room Favorite", [_THISROW].[Id] = [Room]) selecting all favorite entries that match the given room. To see the potential of AppSheet's actions and workflows, you may want to check out this article.
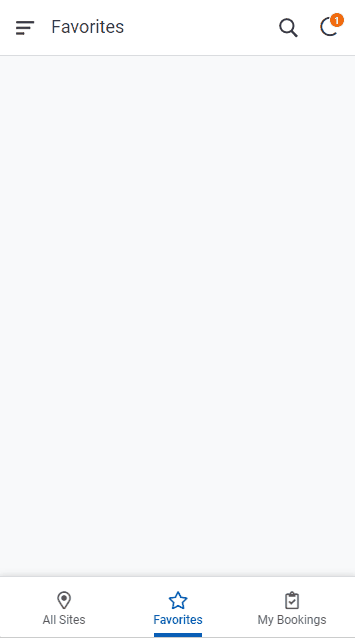
To actually present a user's favorites in the UI, we again make use of the slices feature by creating a slice called "My Room Favorites" based on the Room table. The filter condition is the same as for the "unfavorite button, since this already filters for all favorite rooms. As before, we can now select this slice for a new view in the UX menu. The final behavior can be seen in the animation below.
Bonus tip #1: I set the actions' appearance to "Display overlay" and chose a regular and a solid star icon for the favorite and unfavorite actions respectively to mimic common implementations.
Bonus tip #2: You can "show system actions" at the bottom of the actions page to show the favorite table's delete action. Here you can disable the confirmation toggle, so a user can delete a favorite without being shown a confirmation dialog.
I hope this short introduction into personalization with AppSheet was helpful to you. You can find the complete app template here, as well as its data source. Please join the discussion, if you have any questions or know of similar use cases for the shown features.